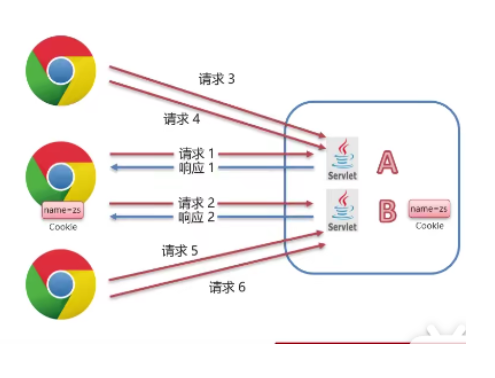
Cookie

Cookie基本使用:

  • Cookie:客户端会话技术,将数据保存到客户端,以后每次请求都携带Cookie数据进行访问

  • Cookie基本使用

    1.创建Cookie对象,设置数据

    1
    Cookie cookie  = new Cookie("key","value");

    2.发送Cookie到客户端: 使用response对象

    1
    response.addCookie(cookie):

    3.获取客户端所携带的所有Cookie,使用request对象

    1
    Cookie[] cookies = request.getCookies();

    4.遍历数组,获取每一个Cookie对象: for

    5.使用Cookie对象防火获取数据

  • Cookie存储时间设置

    cookie.setMaxAge( time ) 其中time以秒为单位,例如一周表示为60 * 60 * 24 * 7

785ygH.png

Session

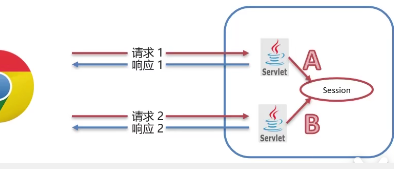
  • 服务器绘画跟踪技术:将数据保存到服务器

  • JavaEE提供HttpSession接口,来实现一次会话的多次请求间数据共享功能

  • 使用:

    1。获取Session对象

    1
    HttpSession session = request.getSession();

    2.Session对象功能:

    • void setArribute(String name,Object o) 存储数据到Session域中

    • Object getAttribute(String name) 根据key获取值

    • void removeArrtibute(String name) 根据key,删除该键值对。

785rCD.png

Cookie和Session对比:

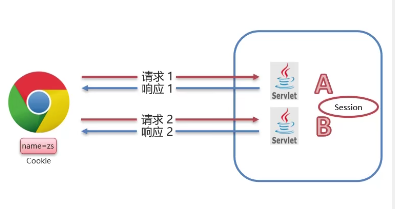
  • Cookie 和Session都是来完成一次会话内多次请求间数据共享的

  • 区别:

    • 存储位置:Cookie是将数据存储在客户端,Session将数据存储在服务器段

    • 安全性:Cookie不安全,Session安全

    • 数据大小:Cookie最大3KB,Session无大小限制

    • 存储时间:Cookie可以长期存储,Session默认30分钟

    • 服务性能:Cookie不占服务器资源,Session占用服务器资源

785s8e.png

页面登录样例:

1.采用三层架构开发思想

dao层创建映射文件UserMapper,并配置select

1
2
@Select("select * from tb_user where username = #{username} and password = #{password}")
User select(@Param("username") String username,@Param("password") String password);

service层创建UserService,并创建login函数

1
2
3
4
5
6
7
8
9
10
11
12
13
public User login(String username, String password)
{
//获取Sqlsession
SqlSession sqlSession = factory.openSession();
//获取UserMapper
UserMapper mapper = sqlSession.getMapper(UserMapper.class);

User user = mapper.select(username,password);

sqlSession.close();

return user;
}

web层创建LoginServlet,

1
2
3
4
5
6
7
8
9
10
11
12
13
14
15
16
17
18
19
20
21
22
23
24
25
26
27
28
29
30
31
32
33
34
35
36
37
38
39
40
41
42
43
44
45
46
47
48
49
50
51
private UserService service = new UserService();
protected void doGet(HttpServletRequest request, HttpServletResponse response) throws ServletException, IOException {
//获取用户名和密码
String username = request.getParameter("username");
String password = request.getParameter("password");

//调用Service方法login
User user = service.login(username, password);
System.out.println(user);

//获取复选框数据
String remember = request.getParameter("remember");


//判断
if(user != null) //登录成功
{
//判断用户是否记住我
if("1".equals(remember))
{
//勾选了,发送Cookie
Cookie c_username = new Cookie("username",username);
Cookie c_password = new Cookie("password",password);

//设置Cookie存储时间为一周
c_username.setMaxAge(60 * 60 * 24 * 7);
c_password.setMaxAge(60 * 60 * 24 * 7);

//发送
response.addCookie(c_username);
response.addCookie(c_password);
}

//将登录成功后的user存储到session中
HttpSession session = request.getSession();
session.setAttribute("user",user);
//登陆成功,跳转到查询所有的Brand的SellectAllServlet去
String contextPath = request.getContextPath();
System.out.println(contextPath);
response.sendRedirect(contextPath + "/selectAllServlet");
}
else //登录失败
{
//存储错误信息到request
request.setAttribute("login_msg","用户名或密码错误");

//跳转到login.jsp
request.getRequestDispatcher("/login.jsp").forward(request,response);
}

}

2.login.jsp

1
2
3
4
5
6
7
8
9
10
11
12
13
14
15
16
17
18
19
20
21
22
23
24
25
26
27
28
29
30
31
32
33
34
35
36
37
38
39
40
41
42
43
44
<%--
Created by IntelliJ IDEA.
User: xyh
Date: 2022/1/14
Time: 11:09
To change this template use File | Settings | File Templates.
--%>
<%@ page contentType="text/html;charset=UTF-8" language="java" %>
<!DOCTYPE html>
<html lang="en">

<head>
<meta charset="UTF-8">
<title>login</title>
<link href="css/login.css" rel="stylesheet">
</head>

<body>
<div id="loginDiv" style="height: 350px">
<form action="/brand/loginServlet" id="form" method="post">
<h1 id="loginMsg">LOGIN IN</h1>
<div id="errorMsg">${login_msg}</div>
<p>Username:<input id="username" name="username" value = "${cookie.username.value}" type="text"></p>

//EL表达式获取存放的cookie的username

<p>Password:<input id="password" name="password" value = "${cookie.password.value}" type="password"></p>

//EL表达式获取存放的cookie的password

<p>Remember:<input id="remember" name="remember" value = "1" type="checkbox"></p>
//value = 1 表示勾选了remember

<div id="subDiv">
<input type="submit" class="button" value="login up">
<input type="reset" class="button" value="reset">&nbsp;&nbsp;&nbsp;
<a href="register.html">没有账号?</a>
</div>
</form>
</div>

</body>
</html>

页面注册样例:

1.同样采用三层架构:

dao层配置mapper

1
2
3
4
5
@Select("select * from tb_user where username = #{username}")       //查询是否存在改用户名
User selectByUsername(String username);

@Insert("insert into tb_user values(null,#{username},#{password})") //若不存在则注册
void add(User user);

service层中创建register函数

1
2
3
4
5
6
7
8
9
10
11
12
13
14
15
16
17
18
public boolean register(User user)
{
//获取Sqlsession
SqlSession sqlSession = factory.openSession();
//获取UserMapper
UserMapper mapper = sqlSession.getMapper(UserMapper.class);

//判断用户名是否存在
User u = mapper.selectByUsername(user.getUsername());
if(u == null) //用户名不存在
{
mapper.add(user);
sqlSession.commit();
}
sqlSession.close();
return u == null; //用户存在

}

web层创建RegisterServlet,

1
2
3
4
5
6
7
8
9
10
11
12
13
14
15
16
17
18
19
20
21
22
23
24
25
26
27
28
29
private UserService service = new UserService();
protected void doGet(HttpServletRequest request, HttpServletResponse response) throws ServletException, IOException {
//获取用户名和密码
String username = request.getParameter("username");
String password = request.getParameter("password");

User user = new User();
user.setUsername(username);
user.setPassword(password);

//调用service注册
boolean flag = service.register(user);

//判断注册成功与否
if(flag)
{
//注册成功,跳转登录页面
request.setAttribute("register_msg","注册成功,请登录");
request.getRequestDispatcher("/login.jsp").forward(request,response);
}
else
{
//注册失败,跳转当前页面
request.setAttribute("register_msg","用户名已存在");
request.getRequestDispatcher("/register.jsp").forward(request,response);
}
}


2.验证码实现

验证码工具类CheckCodeUtil.java :

1
2
3
4
5
6
7
8
9
10
11
12
13
14
15
16
17
18
19
20
21
22
23
24
25
26
27
28
29
30
31
32
33
34
35
36
37
38
39
40
41
42
43
44
45
46
47
48
49
50
51
52
53
54
55
56
57
58
59
60
61
62
63
64
65
66
67
68
69
70
71
72
73
74
75
76
77
78
79
80
81
82
83
84
85
86
87
88
89
90
91
92
93
94
95
96
97
98
99
100
101
102
103
104
105
106
107
108
109
110
111
112
113
114
115
116
117
118
119
120
121
122
123
124
125
126
127
128
129
130
131
132
133
134
135
136
137
138
139
140
141
142
143
144
145
146
147
148
149
150
151
152
153
154
155
156
157
158
159
160
161
162
163
164
165
166
167
168
169
170
171
172
173
174
175
176
177
178
179
180
181
182
183
184
185
186
187
188
189
190
191
192
193
194
195
196
197
198
199
200
201
202
203
204
205
206
207
208
209
210
211
212
213
214
215
216
217
218
219
220
221
222
223
224
225
226
227
228
229
230
231
232
233
234
235
236
237
238
239
240
241
242
243
244
245
246
247
248
249
250
251
252
253
254
255
256
257
258
259
260
261
262
263
264
265
266
267
268
269
270
271
272
273
274
275
276
277
278
279
280
281
282
283
284
285
286
package util;

import javax.imageio.ImageIO;
import java.awt.*;
import java.awt.geom.AffineTransform;
import java.awt.image.BufferedImage;
import java.io.File;
import java.io.FileOutputStream;
import java.io.IOException;
import java.io.OutputStream;
import java.util.Arrays;
import java.util.Random;

/**
* 生成验证码工具类
*/
public class CheckCodeUtil {

public static final String VERIFY_CODES = "123456789ABCDEFGHIJKLMNOPQRSTUVWXYZ";
private static Random random = new Random();


/**
* 输出随机验证码图片流,并返回验证码值(一般传入输出流,响应response页面端,Web项目用的较多)
*
* @param w
* @param h
* @param os
* @param verifySize
* @return
* @throws IOException
*/
public static String outputVerifyImage(int w, int h, OutputStream os, int verifySize) throws IOException {
String verifyCode = generateVerifyCode(verifySize);
outputImage(w, h, os, verifyCode);
return verifyCode;
}

/**
* 使用系统默认字符源生成验证码
*
* @param verifySize 验证码长度
* @return
*/
public static String generateVerifyCode(int verifySize) {
return generateVerifyCode(verifySize, VERIFY_CODES);
}

/**
* 使用指定源生成验证码
*
* @param verifySize 验证码长度
* @param sources 验证码字符源
* @return
*/
public static String generateVerifyCode(int verifySize, String sources) {
// 未设定展示源的字码,赋默认值大写字母+数字
if (sources == null || sources.length() == 0) {
sources = VERIFY_CODES;
}
int codesLen = sources.length();
Random rand = new Random(System.currentTimeMillis());
StringBuilder verifyCode = new StringBuilder(verifySize);
for (int i = 0; i < verifySize; i++) {
verifyCode.append(sources.charAt(rand.nextInt(codesLen - 1)));
}
return verifyCode.toString();
}

/**
* 生成随机验证码文件,并返回验证码值 (生成图片形式,用的较少)
*
* @param w
* @param h
* @param outputFile
* @param verifySize
* @return
* @throws IOException
*/
public static String outputVerifyImage(int w, int h, File outputFile, int verifySize) throws IOException {
String verifyCode = generateVerifyCode(verifySize);
outputImage(w, h, outputFile, verifyCode);
return verifyCode;
}


/**
* 生成指定验证码图像文件
*
* @param w
* @param h
* @param outputFile
* @param code
* @throws IOException
*/
public static void outputImage(int w, int h, File outputFile, String code) throws IOException {
if (outputFile == null) {
return;
}
File dir = outputFile.getParentFile();
//文件不存在
if (!dir.exists()) {
//创建
dir.mkdirs();
}
try {
outputFile.createNewFile();
FileOutputStream fos = new FileOutputStream(outputFile);
outputImage(w, h, fos, code);
fos.close();
} catch (IOException e) {
throw e;
}
}

/**
* 输出指定验证码图片流
*
* @param w
* @param h
* @param os
* @param code
* @throws IOException
*/
public static void outputImage(int w, int h, OutputStream os, String code) throws IOException {
int verifySize = code.length();
BufferedImage image = new BufferedImage(w, h, BufferedImage.TYPE_INT_RGB);
Random rand = new Random();
Graphics2D g2 = image.createGraphics();
g2.setRenderingHint(RenderingHints.KEY_ANTIALIASING, RenderingHints.VALUE_ANTIALIAS_ON);

// 创建颜色集合,使用java.awt包下的类
Color[] colors = new Color[5];
Color[] colorSpaces = new Color[]{Color.WHITE, Color.CYAN,
Color.GRAY, Color.LIGHT_GRAY, Color.MAGENTA, Color.ORANGE,
Color.PINK, Color.YELLOW};
float[] fractions = new float[colors.length];
for (int i = 0; i < colors.length; i++) {
colors[i] = colorSpaces[rand.nextInt(colorSpaces.length)];
fractions[i] = rand.nextFloat();
}
Arrays.sort(fractions);
// 设置边框色
g2.setColor(Color.GRAY);
g2.fillRect(0, 0, w, h);

Color c = getRandColor(200, 250);
// 设置背景色
g2.setColor(c);
g2.fillRect(0, 2, w, h - 4);

// 绘制干扰线
Random random = new Random();
// 设置线条的颜色
g2.setColor(getRandColor(160, 200));
for (int i = 0; i < 20; i++) {
int x = random.nextInt(w - 1);
int y = random.nextInt(h - 1);
int xl = random.nextInt(6) + 1;
int yl = random.nextInt(12) + 1;
g2.drawLine(x, y, x + xl + 40, y + yl + 20);
}

// 添加噪点
// 噪声率
float yawpRate = 0.05f;
int area = (int) (yawpRate * w * h);
for (int i = 0; i < area; i++) {
int x = random.nextInt(w);
int y = random.nextInt(h);
// 获取随机颜色
int rgb = getRandomIntColor();
image.setRGB(x, y, rgb);
}
// 添加图片扭曲
shear(g2, w, h, c);

g2.setColor(getRandColor(100, 160));
int fontSize = h - 4;
Font font = new Font("Algerian", Font.ITALIC, fontSize);
g2.setFont(font);
char[] chars = code.toCharArray();
for (int i = 0; i < verifySize; i++) {
AffineTransform affine = new AffineTransform();
affine.setToRotation(Math.PI / 4 * rand.nextDouble() * (rand.nextBoolean() ? 1 : -1), (w / verifySize) * i + fontSize / 2, h / 2);
g2.setTransform(affine);
g2.drawChars(chars, i, 1, ((w - 10) / verifySize) * i + 5, h / 2 + fontSize / 2 - 10);
}

g2.dispose();
ImageIO.write(image, "jpg", os);
}

/**
* 随机颜色
*
* @param fc
* @param bc
* @return
*/
private static Color getRandColor(int fc, int bc) {
if (fc > 255) {
fc = 255;
}
if (bc > 255) {
bc = 255;
}
int r = fc + random.nextInt(bc - fc);
int g = fc + random.nextInt(bc - fc);
int b = fc + random.nextInt(bc - fc);
return new Color(r, g, b);
}

private static int getRandomIntColor() {
int[] rgb = getRandomRgb();
int color = 0;
for (int c : rgb) {
color = color << 8;
color = color | c;
}
return color;
}

private static int[] getRandomRgb() {
int[] rgb = new int[3];
for (int i = 0; i < 3; i++) {
rgb[i] = random.nextInt(255);
}
return rgb;
}

private static void shear(Graphics g, int w1, int h1, Color color) {
shearX(g, w1, h1, color);
shearY(g, w1, h1, color);
}

private static void shearX(Graphics g, int w1, int h1, Color color) {

int period = random.nextInt(2);

boolean borderGap = true;
int frames = 1;
int phase = random.nextInt(2);

for (int i = 0; i < h1; i++) {
double d = (double) (period >> 1)
* Math.sin((double) i / (double) period
+ (6.2831853071795862D * (double) phase)
/ (double) frames);
g.copyArea(0, i, w1, 1, (int) d, 0);
if (borderGap) {
g.setColor(color);
g.drawLine((int) d, i, 0, i);
g.drawLine((int) d + w1, i, w1, i);
}
}

}

private static void shearY(Graphics g, int w1, int h1, Color color) {

int period = random.nextInt(40) + 10; // 50;

boolean borderGap = true;
int frames = 20;
int phase = 7;
for (int i = 0; i < w1; i++) {
double d = (double) (period >> 1)
* Math.sin((double) i / (double) period
+ (6.2831853071795862D * (double) phase)
/ (double) frames);
g.copyArea(i, 0, 1, h1, 0, (int) d);
if (borderGap) {
g.setColor(color);
g.drawLine(i, (int) d, i, 0);
g.drawLine(i, (int) d + h1, i, h1);
}

}

}
}


3.最终实现:

1.Register.jsp

1
2
3
4
5
6
7
8
9
10
11
12
13
14
15
16
17
18
19
20
21
22
23
24
25
26
27
28
29
30
31
32
33
34
35
36
37
38
39
40
41
42
43
44
45
46
47
48
49
50
51
52
53
54
55
56
57
58
59
60
61
62
63
64
65
66
67
68
69
70
71
72
<%--
Created by IntelliJ IDEA.
User: xyh
Date: 2022/1/14
Time: 18:20
To change this template use File | Settings | File Templates.
--%>
<%@ page contentType="text/html;charset=UTF-8" language="java" %>
<!DOCTYPE html>
<html lang="en">
<head>
<meta charset="UTF-8">
<title>欢迎注册</title>
<link href="css/register.css" rel="stylesheet">
</head>
<body>

<div class="form-div">
<div class="reg-content">
<h1>欢迎注册</h1>
<span>已有帐号?</span> <a href="login.html">登录</a>
</div>
<form id="reg-form" action="/brand/registerServlet" method="post">

<table>

<tr>
<td>用户名</td>
<td class="inputs">
<input name="username" type="text" id="username">
<br>
<span id="username_err" class="err_msg" >${register_msg}</span> //style="display: none本来存在,要去掉,
//${register_msg}需要放到login里id为msg的标签里去
</td>

</tr>

<tr>
<td>密码</td>
<td class="inputs">
<input name="password" type="password" id="password">
<br>
<span id="password_err" class="err_msg" style="display: none">密码格式有误</span>
</td>
</tr>


<tr>
<td>验证码</td>
<td class="inputs">
<input name="checkCode" type="text" id="checkCode">
<img src="/brand/CheckCodeServlet">
<a href="#" id="changeImg">看不清?</a>
</td>
</tr>

</table>

<div class="buttons">
<input value="注 册" type="submit" id="reg_btn">
</div>
<br class="clear">
</form>

</div>

<script>
document.getElementById("changeImg").src = "/brand/checkCodeServlet?" + new Date().getMilliseconds(); //增加更改图片的单击事件,并且因为浏览器会缓存掉图片,所以后面加上 永远不可能与之前相等的值,用time可以满足。
</script>

</body>
</html>

2.CheckCodeServlet

1
2
3
4
5
6
7
8
9
protected void doGet(HttpServletRequest request, HttpServletResponse response) throws ServletException, IOException {
//生成图片
ServletOutputStream os = response.getOutputStream();
String checkCode = CheckCodeUtil.outputVerifyImage(100,50,os,4);

//存入Session
HttpSession session = request.getSession();
session.setAttribute("checkCodeGen",checkCode);
}

3.在RegisterServlet中增添以下代码

该部分代码放在注册之前,即验证码若错误不去访问数据库判断用户名和密码。

1
2
3
4
5
6
7
8
9
10
11
12
13
14
15
16
//获取用户输入的验证码
String checkCode = request.getParameter("checkCode:");

//从Session中获取程序生成的验证码
HttpSession session = request.getSession();
String checkCodeGen = (String) session.getAttribute("checkCodeGen");

//比对
if(!checkCodeGen.equals(checkCode)) //比对不成功,验证码错误
{
request.setAttribute("register_msg","验证码错误");
request.getRequestDispatcher("/register.jsp").forward(request,response);

//不允许注册
return;
}